All organizations, startups and enterprises alike, generate and maintain large quantities of data. To exist and continue business activity data becomes a vital component for their success. The consequence of data loss or corruption due to hardware failure, human error, malware or hacking could be devastating.
Planning for Failure
When talking about a production environment, it is extremely important to take the right precautions to recover your data in case of an unexpected event. Do not think that you will be spared from such an incident, tragedy can and will hit. It’s not a matter of “if” but “when”.
Maybe your data center is located in a hurricane-prone area, cyber hackers are especially drawn to your business industry or your database just crashed due to software or hardware malfunction. Each response to these scenarios is different but the priority is the same: to secure the data and get your organization back up and running as soon as possible.
Therefore, to maintain your business continuity, it’s important to design and test a disaster recovery (DR) plan for your databases.
RTO and RPO
Recovery Time Objective (RTO) and Recovery Point Objective (RPO) are the two main concepts you need to understand when creating your DR strategy. RTO refers to the point-in-time in the future at which you will be up and running again, represented in minutes and hours and RPO refers to the point-in-time in the past to which you will rollback, also represented in minutes and hours.

To give an example, 1 hour RPO and 3 hours RTO, means that you lose up to 1 hour’s worth of data when a disaster occurs and it will take up to 3 hours until the database will be available again.
The value of the RTO and RPO will be determined depending on your company’s requirements and SLA agreements. The lower the values for RPO and RTO, meaning faster recovery times and minimal data loss, the higher the cost to recover. Cost will always play a role in choosing your path to disaster recovery, every workload will have its particular recovery goals, expenses and infrastructure limitations.
Database Disaster Recovery Strategies
RPO, RTO, and cost are three main parameters to be defined when designing the DR plan, and based on these three metrics, you will be able to describe your DR strategy as either a cold DR to a hot DR.
Let’s review the disaster recovery strategies that exist:
- Backup and restore (cold DR, slowest RTO)
- Pilot Light (less cold DR, slow RTO)
- Warm Standby (less hot DR, fast RTO)
- Hot site (hot DR, fastest RTO)
Let’s see how you can implement these DR strategies to your Amazon RDS (Relational Database Service) and how easy it is to enable it.
Backup and Restore
Using this strategy you will make use of Amazon RDS built-in features, automated backups and snapshots.
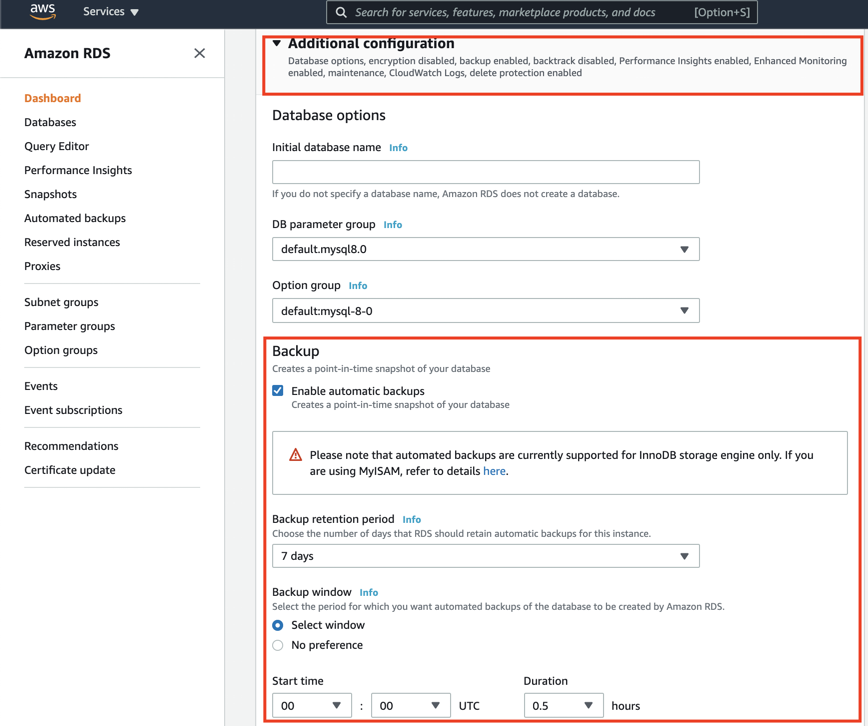
The automated backup feature enables point-in-time recovery of your database instance. When automated backups are turned on for your database instance, Amazon RDS automatically performs a full daily snapshot of your data (during your preferred backup window) and captures transaction logs (as updates to your database instance are made). When you initiate a point-in-time recovery, transaction logs are applied to the most appropriate daily backup to restore your database instance to the specific time you requested. Amazon RDS saves backups of a database instance for a limited, user-specified time called the retention period, which by default is 7 days but can be set to up to 35 days. You can initiate a point-in-time restore and specify any second during your retention period, up to the Latest Restorable Time.
Here’s how to enable automatic backups with a 7 day retention period when creating a new database via the AWS Management Console and update an existing database’s backup policy as well.
Database Snapshots are user-initiated and enable you to back up your database instance in a known state as frequently as you wish, and then restore to that specific state at any time. Database Snapshots can be created with the AWS Management Console, API, SDK, or CLI and are kept until you explicitly delete them. You can also create automated snapshots using AWS Lambda function that will be invoked by Amazon EventBridge hourly/daily, the function will create the database snapshot and can copy it within the region, across regions or accounts if needed.
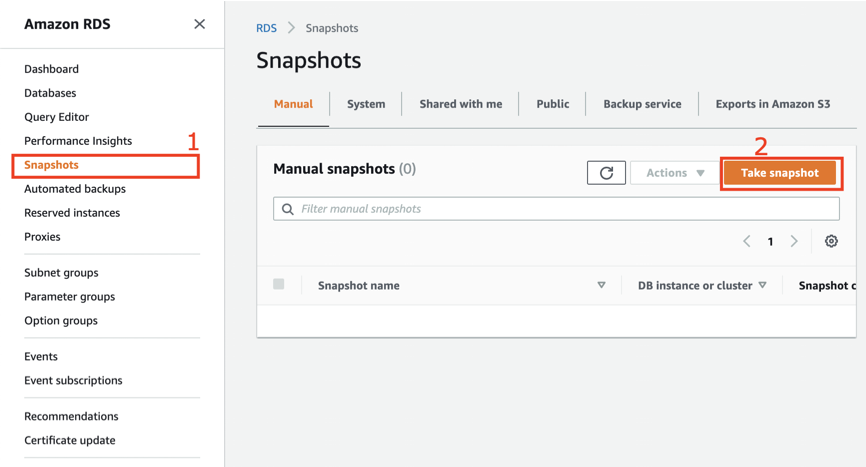
Here is how to create a manual DB snapshot using the AWS Management Console:
- Click on the “Snapshots” in the RDS service console
- Click on “Take snapshot”
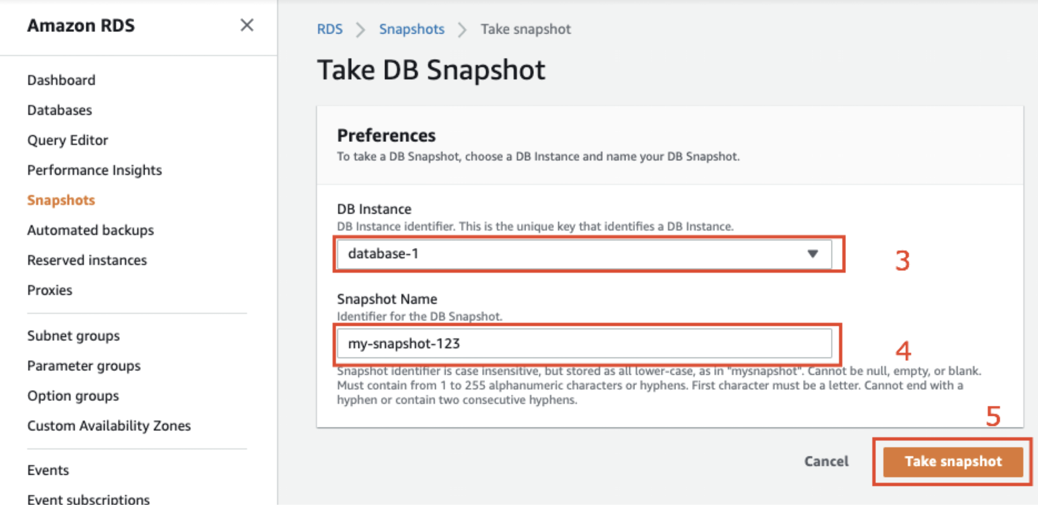
3. Choose the relevant database you want to take a snapshot of
4. Name the snapshot
5. Click on “Take snapshot”
RTO for recovery can vary from minutes to hours, the duration depends on the size of the database and the failure type, RPO for recovery is typically 5 minutes which is the time required for copying transaction logs to Amazon S3.
Pilot Light
Implementing this strategy you get a quicker recovery time which is more costly than the backup-and-restore approach because you simply replicate part of your IT structure for a limited set of core services and continually keep it up to date, this approach is an example of an active-passive failover configuration.
In this scenario, you would usually keep asynchronous database replication in a different Availability Zone or Region and maybe some other reduced resources, when the time comes for recovery, you can rapidly provision a full-scale production environment around your critical core, notice that unlike a backup-and-restore approach, you must ensure that your most critical core elements are already configured and running.
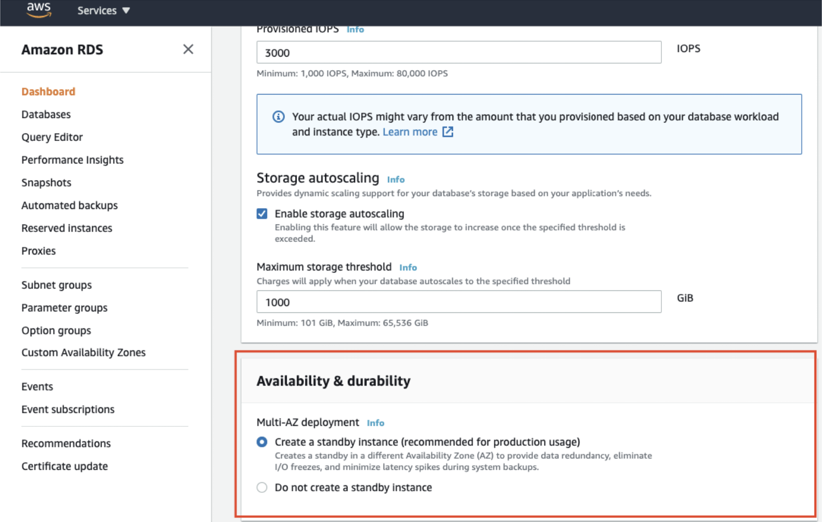
In Amazon RDS, this ability is given as an out-of-the-box feature that is called Multi-AZ deployment. When creating a new or updating an existing database you simply need to click on a button to enable it. Then AWS will create a standby instance in a different availability zone that will automatically failover in the case of a failure on the primary instance. Mind that the cost of the DB will be doubled due to keeping an additional database that is up and running at all times.
It is important to mention that for RDS Aurora databases the standby instance will act as a read replica as well, while for non-Aurora RDS databases will be available to use only in case of a failover event.
Here is how to enable standby instance (Multi-AZ) when creating a new database (non-Aurora) using the AWS Console. Here you can also update your existing databases to Multi-AZ mode.
Warm Standby
Warm standby is similar to the pilot light approach (active-passive failover configuration), it extends the pilot light elements and preparation and has shorter recovery times, as it makes use of a reduced capacity environment that can be rapidly extended in the event of a catastrophe. The main difference between the two lies in the size and complexity of the standby environment. While a pilot light contains only scaled-down core systems, a warm standby environment includes everything that your primary production environment uses, and always has them on.
This approach is not scaled to take a full-production load, but it is fully functional, in case of disaster, the system is scaled up quickly to handle the production load. Note that this approach will usually be more costly than pilot light since more than just the core components are provisioned.
In regards to its setup in AWS RDS, it will be the same steps, using a standby instance as shown in the previous Pilot Light section. The main difference here will be the rest of the components of the system, like servers, load balances, etc.
Hot site
Leveraging this approach you will keep a full-scale duplicate of the production environment with a constant replication of the data (active-active failover configuration). When it comes to ease of recovery, the Hot site approach is unmatched. There is generally no downtime at all and little to no data lost, no matter how stringent RTO and RPO specifications are, they can be satisfied.
A hot site is by far the best and the safest option, but it does come at the highest price tag. If there is any issue in the production site, you just need to reroute your traffic to the failover environment and you are good to go.
In regards to setting it up in AWS RDS, it will be the same steps as using a standby instance as shown in the previous Pilot Light section. The main difference here will be the rest of the components of the system, like servers, load balances, etc. are running.
Final Thoughts
As part of your DR strategy, it is extremely important to test once in a while to ensure it will respond in a time of a disaster as planned. In regards to operational excellence, it is always best practice to use Infrastructure as Code (IaC) like AWS CloudFormation/AWS CDK/Terraform instead of manually provisioning to prevent human error and speed up deployments.
In this blog post, I presented the “plan for failure” approach, what is RTO and RPO, and showed how to use AWS’ built-in DB disaster recovery features. These insights were taken from real-world projects experience as a data engineer at AllCloud.
If you have any questions about Disaster Recovery and/or Databases on AWS, our Data team is ready to help you create your DR strategy. Contact us.