Optimize your Kubernetes infrastructure for better performance cost savings.
Many organizations using Amazon EKS still rely on Cluster Autoscaler, which often leads to over-provisioning and rising infrastructure costs. This guide walks you through a zero-downtime migration to Karpenter, a smarter and more efficient autoscaler for Kubernetes.
Why Migrate to Karpenter?
Many organizations running Kubernetes on Amazon EKS rely on Cluster Autoscaler (CA) to manage node scaling. While CA is a proven tool, it often results in underutilized infrastructure, slower scaling, and higher costs.
Here’s why migrating to Karpenter is a game changer:
Faster Scaling
Karpenter provisions new nodes in 60–90 seconds, compared to 3–5 minutes with Cluster Autoscaler.
Intelligent Instance Selection
Automatically chooses the most cost-effective and performance-optimized instance types, including support for Spot Instances.
Cost Optimization
By leveraging Spot capacity and better bin-packing, Karpenter helps cut infrastructure costs by 40–60%.
Improved Resource Utilization
Smarter scheduling = fewer idle resources and better cluster efficiency.
Cluster Autoscaler Disadvantages:
- No support for dynamic instance type picking – Relies on Auto Scaling Groups with predefined instance types that must be manually configured in advance, unlike Karpenter which can dynamically select from hundreds of available instance types based on workload requirements
- Limited Spot Instance flexibility – Doesn’t support intelligent failover from Spot to On-Demand instances, only hardcoded percentages
- ASG-dependent scaling constraints – Min/Max scaling is tied to Auto Scaling Group configurations
- Slow node provisioning – Adds nodes slowly, reacting to unschedulable pods.
- Poor resource utilization – Leads to over-provisioned clusters and wasted costs due to inflexible instance selection.
Pre-Migration Assessment
Before making any infrastructure changes, it’s critical to understand the current state of your EKS cluster. A successful migration to Karpenter starts with identifying inefficiencies and uncovering opportunities for optimization.
# Node overview

kubectl get nodes -o wide
kubectl top nodes

# Pod resource requests vs actual usage

kubectl top pods --all-namespaces

kubectl describe nodes | grep -A5 "Allocated resources"
Step 1: Analyze Your Current State
What to check:
- Cluster resource usage
Review total node count, CPU and memory utilization across your workloads. - Application requests vs. actual usage
Most apps request more CPU/memory than needed, leading to inefficiency. - Instance type efficiency
Assess if current instance types fit your workload characteristics. - Scaling behavior
Look at how long scaling takes and how well it matches demand. - Cost visibility
Identify high-cost patterns or unused capacity.
Tools to use:
- Kubernetes Resource Recommender (KRR)
- CloudWatch Metrics
- AWS Cost Explorer or AWS Cost Management Tools
- Grafana and Prometheus
Our Real Customer Use Case:
In our recent implementation with a production EKS cluster, we discovered several critical inefficiencies:
Key Findings:
- 2–3x over-provisioned CPU/memory
- Node utilization < 20%
- Current node count: 22 nodes
- Cost dominated by on-demand instances
- Cluster Autoscaler too slow to meet demand
- Instance types: m6a.xlarge
- Over-provisioned applications
Phase 1: Resource Optimization
Step 2: Right-Size Your Applications
Before deploying Karpenter, we focused on optimizing workloads to improve efficiency, availability, and readiness for consolidation:
- Health checks
Add readiness, liveness, and startup probes. - High availability
Use multiple replicas and appropriate autoscaling metrics. - Resource right-sizing
Apply KRR recommendations; test changes gradually. - PodDisruptionBudgets (PDBs)
Temporarily relax constraints to allow node consolidation.
Best Practices Before Implementation
# Add to all services
readinessProbe:
httpGet:
path: /health
port: 8000
initialDelaySeconds: 15
periodSeconds: 5
livenessProbe:
httpGet:
path: /health
port: 8000
initialDelaySeconds: 30
periodSeconds: 10
startupProbe:
httpGet:
path: /health
port: 8000
initialDelaySeconds: 10
periodSeconds: 5
failureThreshold: 12
High Availability Setup:
# Minimum 2 replicas for production
autoscaling:
enabled: true
minReplicas: 2
maxReplicas: 20
targetCPUUtilizationPercentage: 65
targetMemoryUtilizationPercentage: 70
# For RabbitMQ-based scaling
autoscaling:
type: rabbitmq
rabbitMqEnv: CELERY_BROKER_URL
queues:
– length: 20
name: celery-queue
Fix PodDisruptionBudgets
# Enable node draining
minAvailable: 0%
Resource Optimization with KRR
KRR analyzes historical pod usage (CPU and memory) and provides right-sizing recommendations based on filters like specific hours or days to reflect realistic workload patterns.
- Install and Run KRR Analysis
# Install KRR

pip install krr

# Run analysis on production cluster

krr simple --cluster your-cluster-name --allow-hpa --history_duration=336
Zoom image will be displayed.
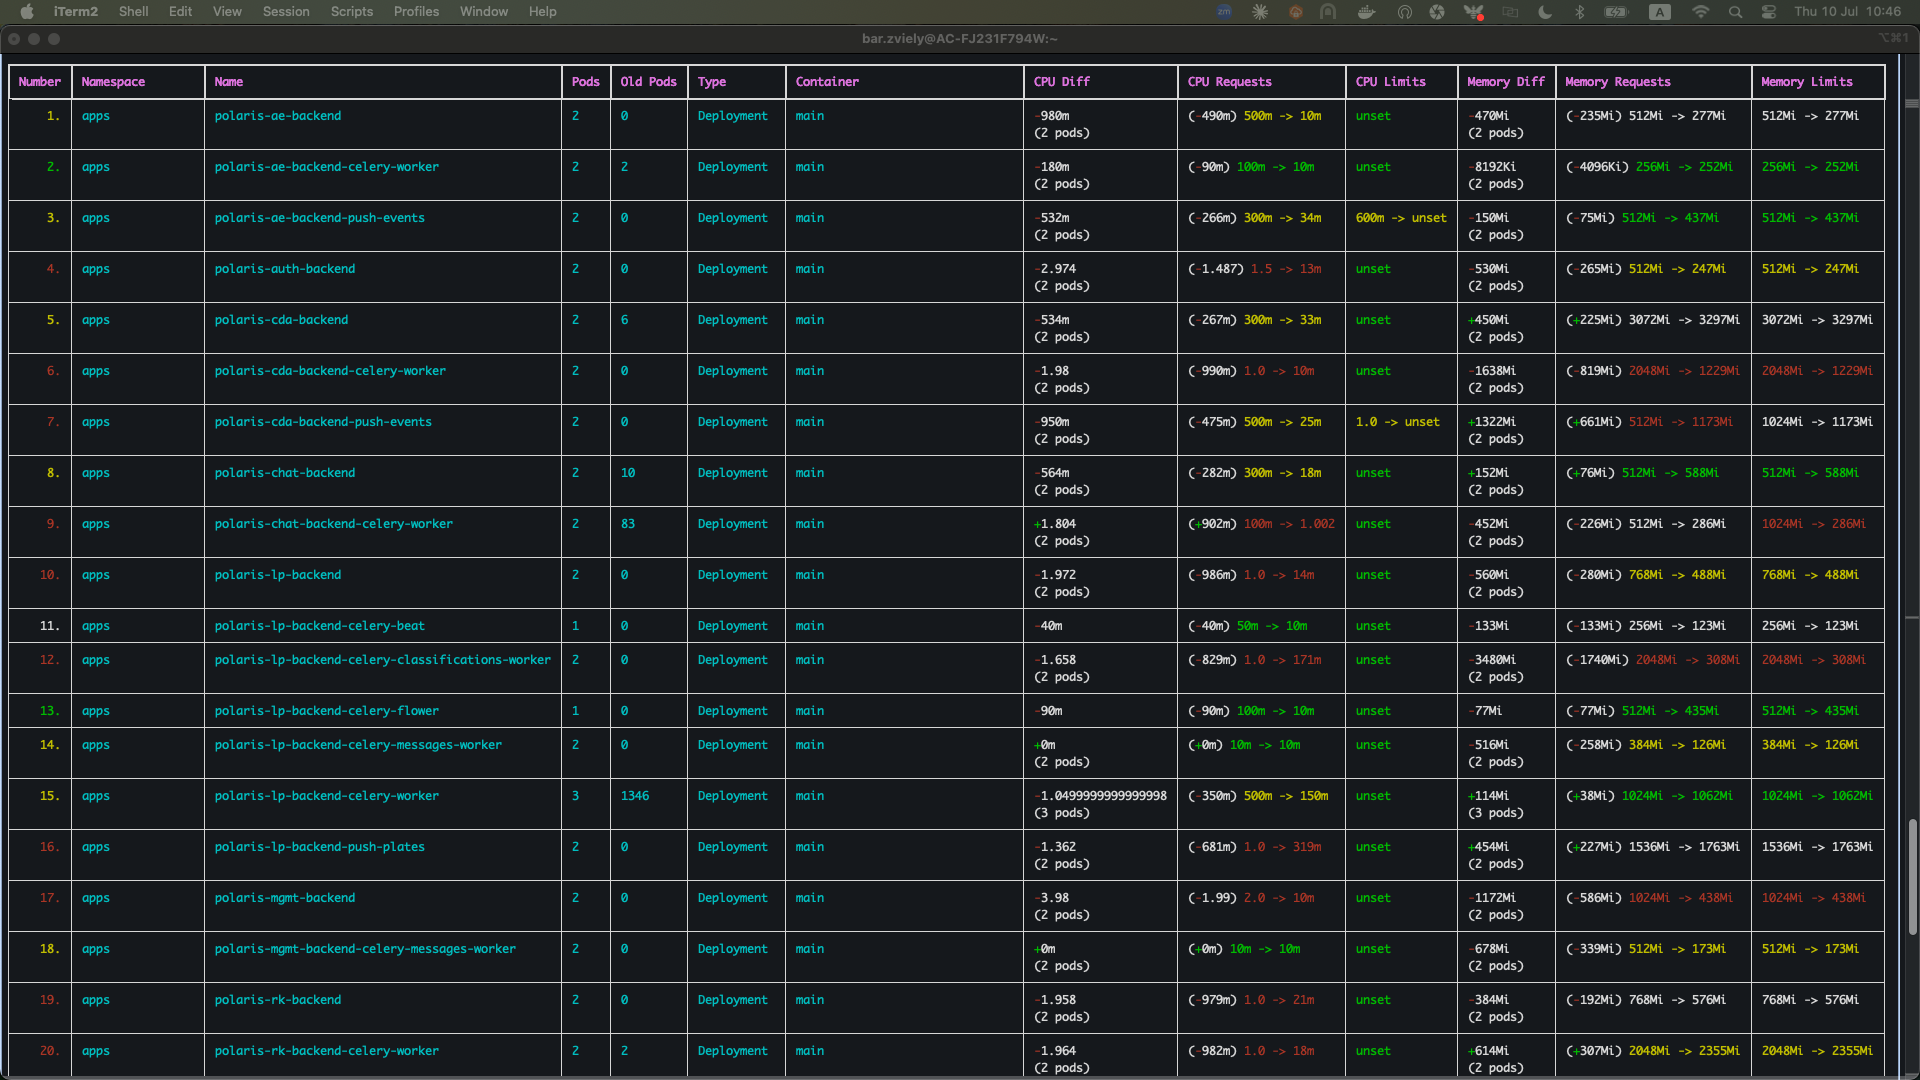
In the images, memory and CPU requests are compared to the recommended values; red highlights indicate requests that are significantly higher than necessary.
Zoom image will be displayed.
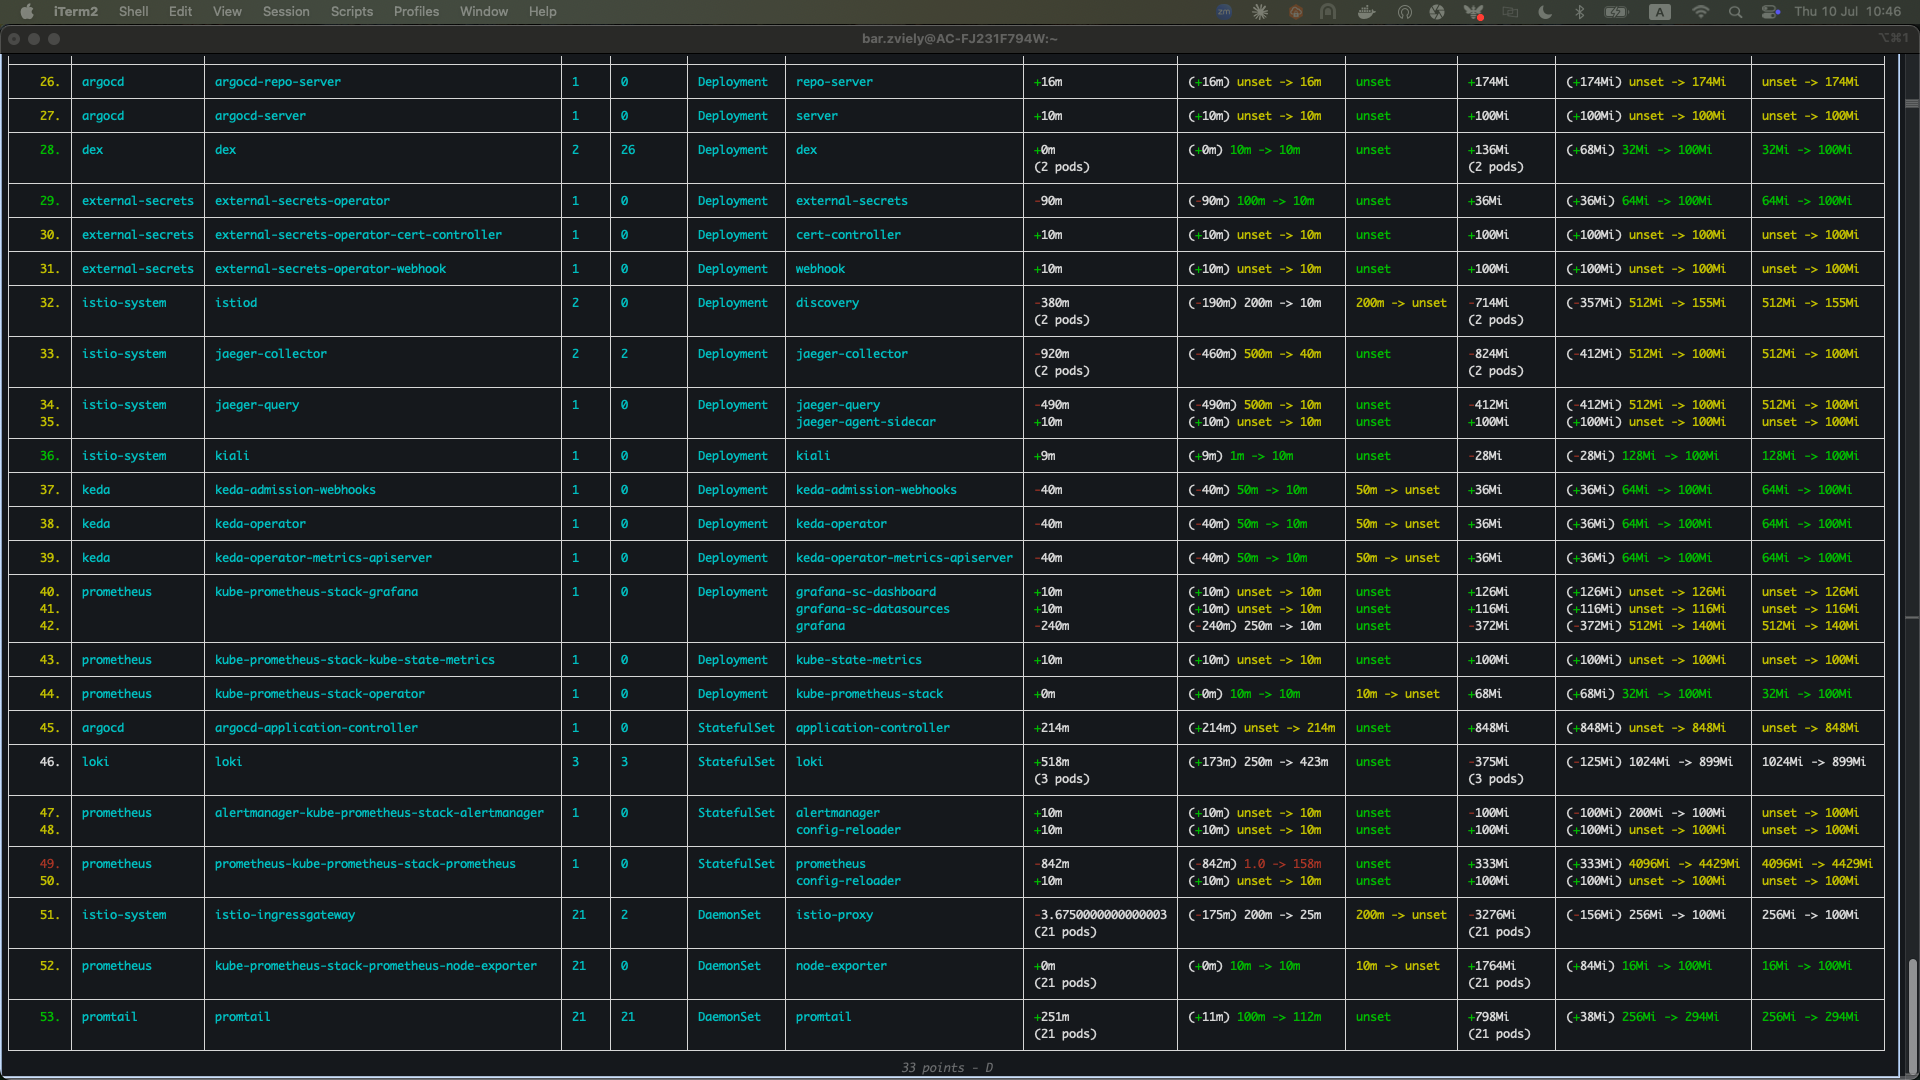
Key KRR Findings Example:
- backend services: Most of them requesting 500m CPU, using 50m
- celery-workers: Memory over-allocated by 60%
- Recommendation: Reduce overall resource requests by 40–60%
Apply Resource Changes
It is recommended to always set memory requests and limits to ensure stable pod scheduling and avoid OOM kills. However, setting CPU limits is generally discouraged, as it can lead to throttling and degraded performance under load. CPU requests are important for scheduling, but limits can harm performance more than help.
Setting appropriate resource requests is your responsibility as an application owner. Use data to guide decisions based on actual usage patterns.
For more insight, see:
Example optimization:
# Before

resources:

 requests:

   cpu: 500m

   memory: 512Mi

 limits:

   memory: 1Gi

# After (KRR optimized)

resources:

 requests:

   cpu: 50m

   memory: 280Mi

 limits:

   memory: 340Mi
Step 3: Deploy and Validate Changes
Apply and test in dev/staging environments before production.
Expected results:
- Node count reduction: 40–60%
- Cluster utilization increase: from ~15% to 40%+
- Same performance, lower cost
- Cost savings: ~50%
Dev and Staging Envs Load Testing
To validate our optimizations and ensure reliable scaling behavior, we ran synthetic load tests in the staging environment. This simulated high traffic and stressed the cluster, helping us confirm that resource right-sizing, autoscaling policies, and HA settings were functioning as expected under pressure.
Phase 2: Deploy Karpenter
Step 4: Prepare Infrastructure
Karpenter controller running alongside Cluster Autoscaler
Infrastructure Prerequisites + Deploy Karpenter Controller + Create NodePool Configuration.
Requirements:
- Tagged subnets and security groups
- IAM role with EC2 permissions
- Proper VPC configuration
Deployment strategy:
- Run Karpenter alongside Cluster Autoscaler
- Use Helm or Terraform
- Karpenter nodes outside ASGs
NodePool/Provisioner setup:
- Define instance types, capacity types, zones
- Enable consolidation
- Separate general and critical workloads
What is Consolidation?
Consolidation is Karpenter’s automatic cost optimization feature that continuously monitors node utilization and intelligently moves workloads from underutilized nodes to more efficient placements. When nodes become empty or underutilized Karpenter automatically terminates them, reducing your infrastructure costs without manual intervention.
PodDisruptionBudgets can block consolidation by preventing pod movement, which is why temporarily relaxing PDBs during migration allows Karpenter to optimize node usage more effectively.
Phase 3: Controlled Migration
Step 5: Implement Node Affinity Strategy
Two-tier node strategy:
- Critical infrastructure → On-demand nodes
- Application workloads → Spot or mixed capacity
Use nodeAffinity rules and labels to direct workloads.
Managing Spot vs. On-Demand Deployments
To gradually introduce Spot capacity, we defined separate NodePool (or Provisioner) resources for on-demand and spot instances. Then, we used pod-level node affinity and tolerations to control where each workload could be scheduled.
This allowed us to test Spot reliability with non-critical workloads while keeping core services on on-demand nodes.
This approach gave us confidence in Spot’s performance before expanding its usage cluster-wide.
Infrastructure Services (On-Demand):
nodeSelector:
karpenter.sh/capacity-type: “on-demand”
Application Services (Mixed/Spot-Preferred):
affinity:

 nodeAffinity:

   requiredDuringSchedulingIgnoredDuringExecution:

     nodeSelectorTerms:

     - matchExpressions:

       - key: type

         operator: In

         values: ["app-node-pool"]

Using Taints and Tolerations for Workload Isolation
To prevent basic deployments from accidentally scheduling on expensive on-demand nodes, implement taints and tolerations as an additional layer of control.
Taint your on-demand nodes with a "dedicated=critical:NoSchedule" taint. This ensures that only pods with the corresponding toleration can be scheduled on these nodes.
Basic application deployments without tolerations will automatically be blocked from on-demand nodes and forced to use Spot instances. This approach provides cost discipline by ensuring that only explicitly configured critical workloads can access expensive on-demand capacity, while regular applications are directed to cost-effective Spot nodes.
This taint/toleration strategy works alongside node affinity to create multiple layers of workload placement control.
Step 6: Execute Gradual Migration
Migration approaches:
- Option 1: Natural migration
Let workloads reschedule slowly. - Option 2: Rolling restart
Force redeployments with zero downtime.
# Force immediate migration (5-10 minutes)
kubectl get deployments -n apps -o name | xargs -I {} kubectl rollout restart {} -n apps
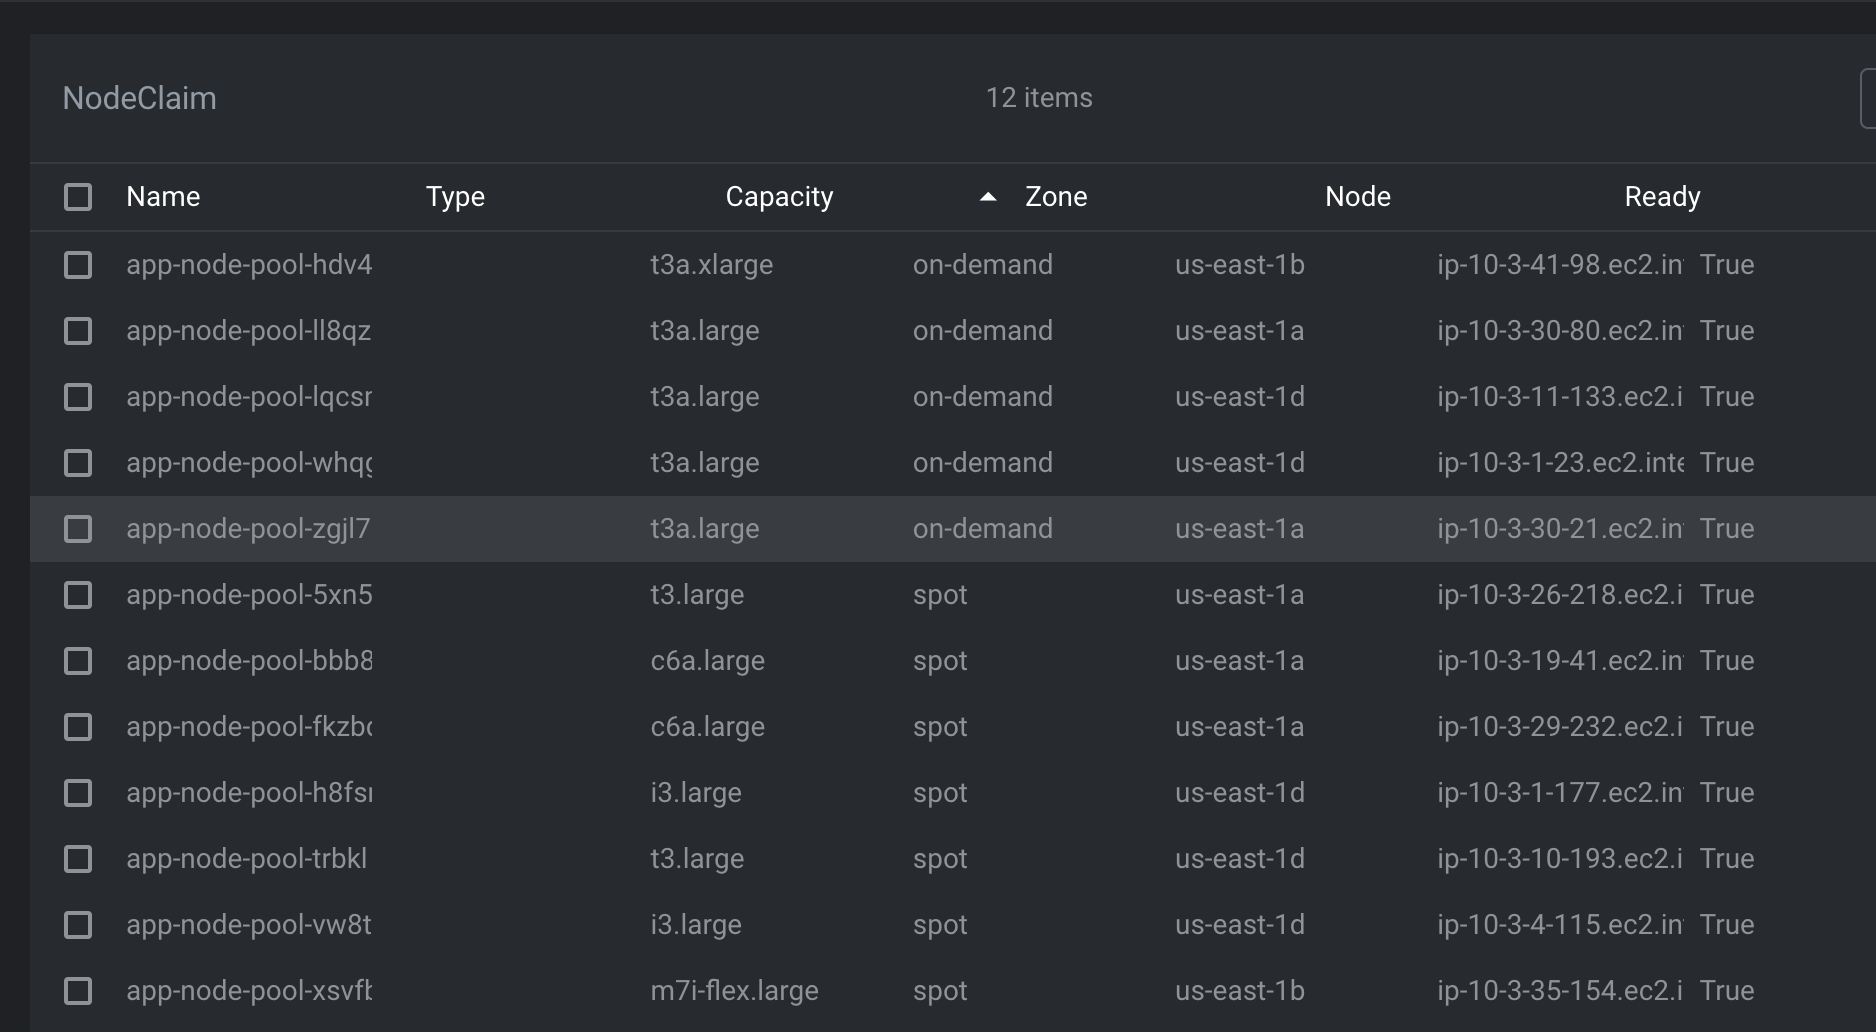
Pods moving from CA nodes to Karpenter nodes
Monitor during migration:
- Pod placement
- App performance
- Spot interruptions and rescheduling behavior
# Watch pod distribution
kubectl get pods -o wide –all-namespaces | grep -E “(karpenter|cluster-autoscaler)”
# Node status
kubectl get nodes -l type=app-node-pool
Phase 4: Complete Transition
Step 7: Clean Up Legacy Infrastructure
Handle system components:
- Temporarily relax PDBs
- Drain and move system pods
- Restore PDBs afterward
Node cleanup tasks:
- Delete ASG nodes
- Remove Cluster Autoscaler
- Clean up related AWS resources
- Remove migration-specific taints/affinities
Drain CA Nodes Validation and Monitoring
# Cordon and drain all CA nodes
kubectl cordon -l eks.amazonaws.com/nodegroup
kubectl drain -l eks.amazonaws.com/nodegroup –ignore-daemonsets –delete-emptydir-data —timeout=600s
Final Cleanup:
# Scale down Cluster Autoscaler
kubectl scale deployment aws-cluster-autoscaler -n kube-system –replicas=0
# Restore system PDBs
kubectl patch pdb aws-cluster-autoscaler -n kube-system -p ‘{“spec”:{“minAvailable”:null,”maxUnavailable”:1}}’
Step 8: Verify Migration Success
What to measure:
- Node startup time
- CPU/memory utilization
- Spot usage and fallback behavior
- Infrastructure cost change
Performance Metrics
# Check cluster utilization
kubectl top nodes
kubectl get nodes
# Verify application health
kubectl get pods –all-namespaces | grep -v Running
Key Success Metrics:
- Node count: 22 → 8–12 nodes
- Utilization: 10% → 40–60%
- Scaling time: 5 minutes → 90 seconds
- Cost reduction: ~50%
- Zero downtime achieved
Zoom image will be displayed.
Long-term monitoring:
- Set alerts for scheduling/provisioning errors
- Watch controller logs
- Track costs and scaling patterns
- Maintain a change log
Best Practices
- Test thoroughly in staging
- Migrate in phases
- Add proper health checks
- Use at least 2 replicas for key services
- Monitor throughout migration
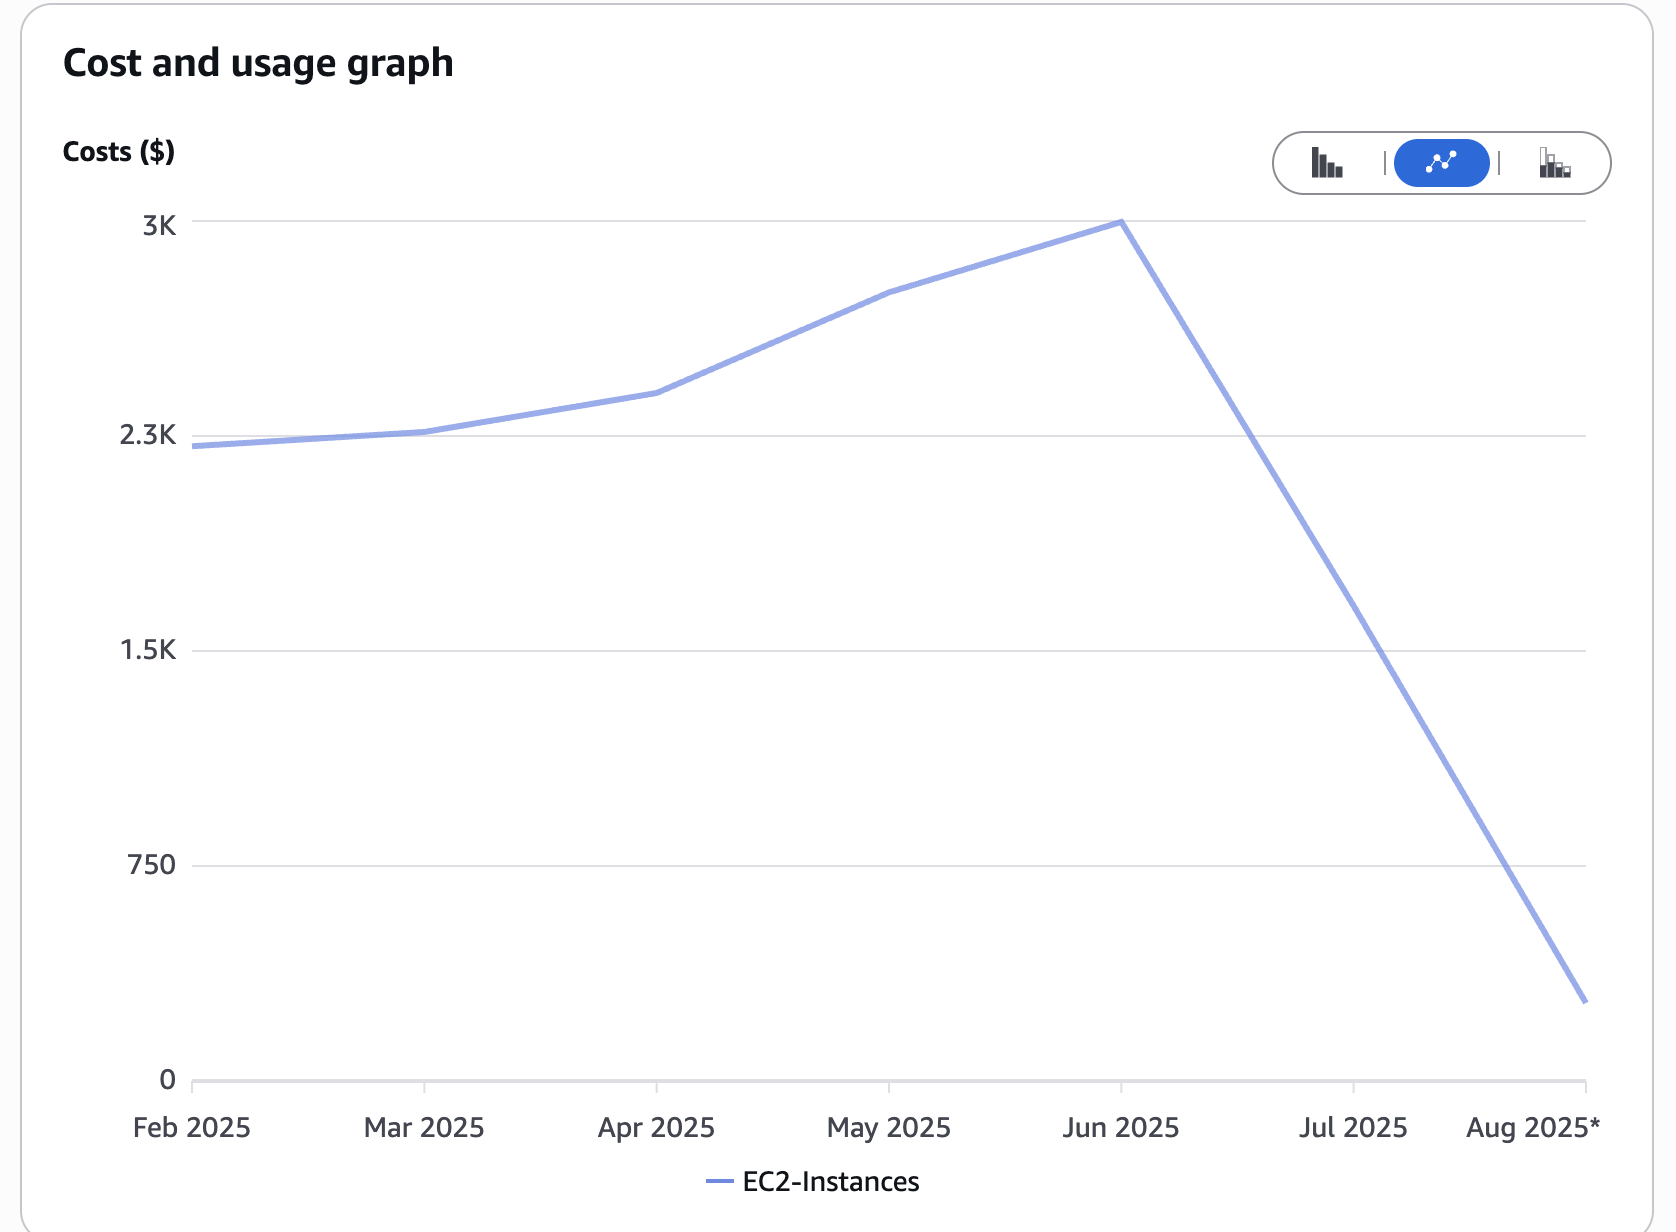
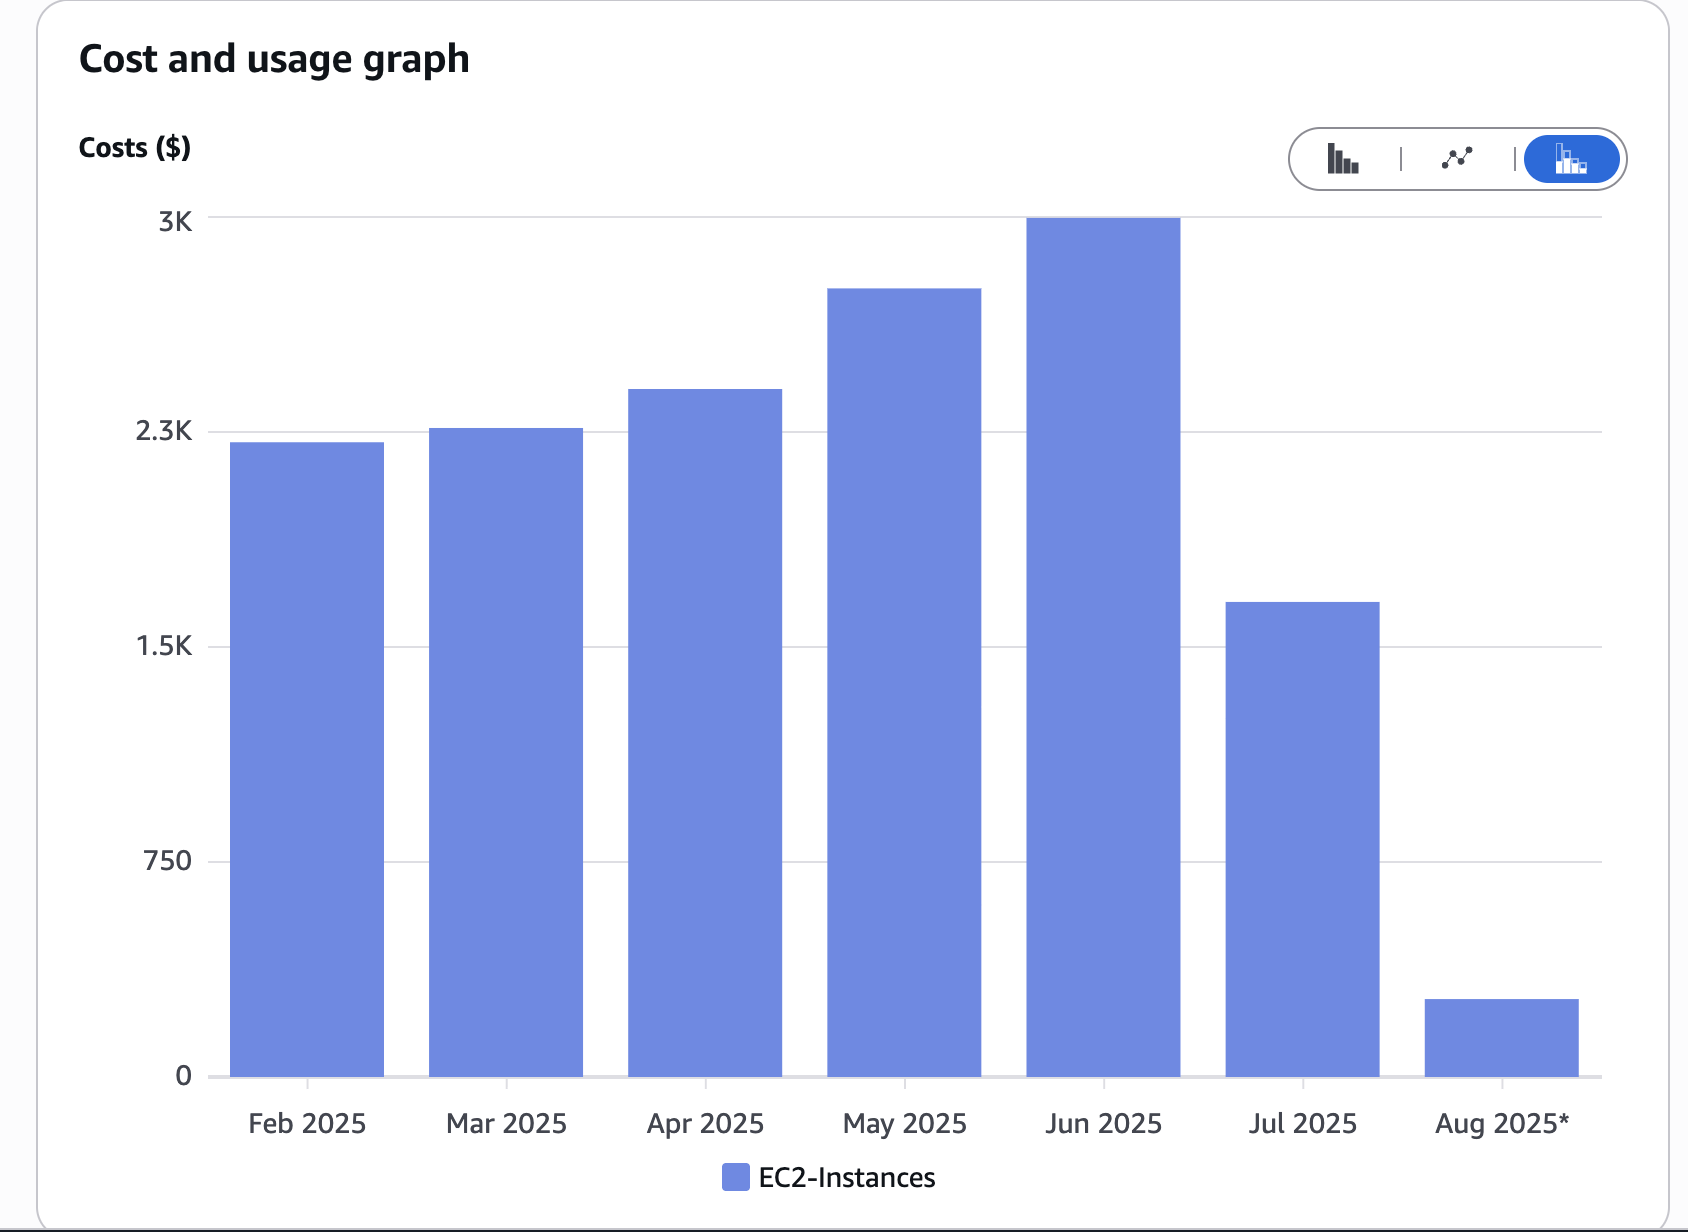
Cost Analysis Details
We tracked cost impact throughout the migration to measure ROI clearly.
Cost Breakdown:
- Before: ~$9,000/month (22 nodes × ~$410 on-demand)
- After: ~$3,800/month (12 nodes, ~70% Spot)
- Savings: ~58% reduction in monthly infra costs
- ROI Timeline: Break-even in less than 4 weeks (including engineering time and testing)
These savings came primarily from reducing overprovisioning, replacing underutilized nodes, and shifting most workloads to Spot capacity.
Zoom image will be displayed.
Zoom image will be displayed
Next Steps and Advanced Configurations
Post-migration optimization:
- Tune provisioning configs
- Adjust spot/on-demand weighting
- Standardize provisioning rules
Advanced workload strategies:
- Use taints/tolerations for workload separation
- Add burstable pools for spikes
- Combine with HPA/VPA
Scaling across environments:
- Replicate setup across all clusters
- Create CI pipelines for config changes
- Build dashboards for monitoring and cost
Conclusion
Migrating from Cluster Autoscaler to Karpenter is not just a technical upgrade—it’s a strategic shift. Benefits include lower infra costs, faster and more intelligent scaling, simpler declarative provisioning, and higher utilization with less waste. The recommended approach is to optimize workloads first, deploy Karpenter in parallel, migrate with control, and monitor and tune continuously. Spot vs. on-demand usage can be gradually introduced using node affinity to safely place critical workloads on stable instances while testing others on Spot. With careful planning, the migration yields immediate ROI and a more scalable, cost-efficient Kubernetes platform for the future.

Bar Zviely
DevOps Engineer